This was my latest makeover project--our upholstered metal folding chairs.
Before
After
Pretty nice upgrade, wouldn't you say? But what is even more interesting, I think, is the behind-the-scenes footage of this saga, because the reality is, behind every pretty picture of a craft I've completed, is a slew of headaches and frustrations that are lost to the public eye as soon as I post a polished "after" photo.
This is the truth of crafting that Pinterest will not tell you.
Other mishaps in my past include:
the orange door
our family room
There was also our dining table that I refinished TWICE and
still has pockmarks, because apparently, I'm horrible at sanding away pre-existing varnish. And my purple bookshelf that I painted with such alacrity in college, but learned the difficult way the indispensable importance of primer when all its painted stripes peeled off, taking along with it my hard work and motivation. I ended up taking a whole quarter (or was it two) to finally finish that thing.
And now these reupholstered folding chairs.
Every tutorial I had encountered proclaimed how easy this project was, and you know, after I got that first one done, the rest really were fairly simple, but that first chair. Oh, that first chair. I can't look at that pink chair without a little bit of a grimace. Here is what I had to learn, the hard way:
- You need short staples (1/4") to attach your new fabric, otherwise your staples will go through the top panel. (There was NOT ONE tutorial online that I could find that addressed my problem of staples going through, so I provide a solution here. See next bullet for solution #2.)
- You need a thick home decorating fabric, (and even then, there are thinner ones interspersed with the thicker ones... don't go for those), otherwise your staples will go through the top panel. My pink fabric is thinner, and I had to resort to stapling only partially through, so as not to injure my guests who will be sitting in this chair. (I could have also kept the original fabric on underneath, but the pattern showed through the white part of my pink fabric. This is another reason to buy a thicker fabric, so that you don't have to go through the hassle of removing the original fabric.)
 |
| My thinner fabric requires me to staple only partially through, lest the staples puncture through the other side, stabbing my unassuming guests in the back. |
- Use a heavy duty staple gun. Don't go for the prettier, lighter one advertised to be easier on your hands (EVEN if the packaging has on it a picture of a man stapling together a wooden birdhouse... don't trust it). Otherwise, you will end up with two staple guns and have spent $23 instead of $9, when the prettier, easy-on-the-hands one refuses to puncture anything. What worked was the Arrow JT27.
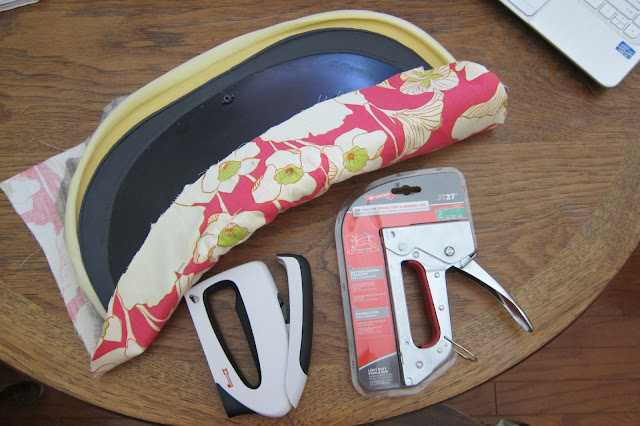 |
| Go for a heavy duty staple gun, like the one on the right. |
- When purchasing anything, double check that you have the right items and that they are in working order, like, say, that your spray adhesive is not missing a nozzle. Otherwise, you will make the untimely discovery the next time you craft, i.e. when the baby is napping, and therefore, you will be home-bound, and unable to move on with your project, you will be left with nothing else to do but twiddle your thumbs. Talk about a momentum-buster.
- Speaking of spray adhesive, don't use it indoors at your dining table. This seems like common sense, and apparently, I don't have any. If you, too, lack common sense, you will get spray adhesive all over your table, computer, phone, and anything else that's lying within a 2-foot radius of your target. You will then need to use GooGone and some soapy water to remove adhesive (you're welcome for doing the research for you).
- The bottom panel that you sit on is not a uniform square, at least it wasn't on my chairs. The back corners are more tapered than the front ones. Therefore, it matters which way your fabric is lined up. Lay your fabric on to check if it lines up correctly BEFORE you staple it all on... otherwise, you will find yourself grumbling under your breath as you rip out all the staples, rotate your fabric, and then staple it back on again.
 |
| NOOOO!!! |
- If you have chairs with these plastic push-in rivets on the bottom, as opposed to metal screws, curse the chair-making powers that be and then decide your course of action. More on this below, but DON'T try to cut them off with scissors. It is an ineffective method that will take too much time and will hurt your hands in the process. There are better ways to remove the rivets.
Okay, now that I've finished airing my frustrations and thoroughly scared some of you from attempting this project, let me assure you that it really is quite simple. ;) Here's what I did that worked, and hopefully my mistakes will save you some time and headache... though if you're anything like me, you, too, must learn the hard way. What doesn't kill you makes you stronger, right? Yes, I believe that can be applied to crafting.
How to Reupholster Your Folding Chair
Materials:
Additional materials you may need:
1. Unscrew the top and bottom panels. Or, if you are unfortunate like me, your chair panels are attached by plastic push-in rivets. Use a hammer to pound them out. If the rivets are not too shredded, you can simply reinsert the panel when you are finished reupholstering it. (Test by replacing the seat panel to see if old rivets will hold.) If, though, they are not reusable, or if you want a sturdier attachment, you can replace the rivets with the round head screws.
2. Hopefully, your new fabric is nice and thick and not see-through, so you can simply lay it on top of the original fabric. However, if your original fabric is in poor condition, or if you want to replace the plastic push-in rivets with screws, then you'll need to remove the original fabric using a screwdriver to lift the staples.
3. If you are replacing the plastic rivets with screws, pull the cushion apart from the backing and remove rivets and reinsert round head screws. I used masking tape to keep the screws in place before I flipped the board back over so that the screws are pointed outwards.
4. Laying the panels on top of your new (and ironed) fabric, cut out pieces with about 1-1/2 to 2 inches extra on each side. Be aware of which sides are the front and back of your panel, and align your fabric accordingly. Use spray adhesive (outside!) to secure fabric, and then start stapling. Start in the middle of one side, and add a couple more on either side, spaced evenly apart. Pull the fabric taut, and repeat on the opposite side. Continue on the third side, and then it's opposite side.
5. When you get to the corners, be sure to pleat the fabric before stapling, working around each curve.
6. Cut away excess fabric that may be covering the holes for your screws. Realign your panels to the chair, and screw back into place. If you replaced the push-in rivets with screws, attach bolts now. If you kept the old push-in rivets, all you need to do is snap the seat panel back in position. A little wobbly? Or maybe you were too lazy to replace the broken rivets? Use the E6000 glue. This is an easy solution, but you won't be able to take the panel off again.
7. And that's it! Enjoy your chair!
Easy, right? Haha, I guess you'll have to find out.
As for Lucy, she's content to play with protective plastic wrap and paint silly expressions, even when her chairs don't turn out. No sweat. Maybe I should take a page from her book.
 |
Taking a break from her painting project
|